
Run The Bridge
wordpess-mysql 환경변수를 configmap으로 올리기, nginx 관련 실습 본문
0. 실습과제

1. wordpress-mysql이 사용하는 환경변수를 configmap을 이용하여 적용하기
먼저 mysql configmap파일을 만들어야 한다.
만약 configmap을 어떻게 써야 하는지 모르겠다면 먼저 예전 mysql.yaml 파일 자체를 configmap으로 만들면 된다.
kubectl apply -f mysql-pod.yaml  # 예전에 만든 mysql-pod.yaml 파일 실행

kubectl exec mysql -- env  # 환경설정파일 확인
빨간색 네모 박스 부분만 필요하다
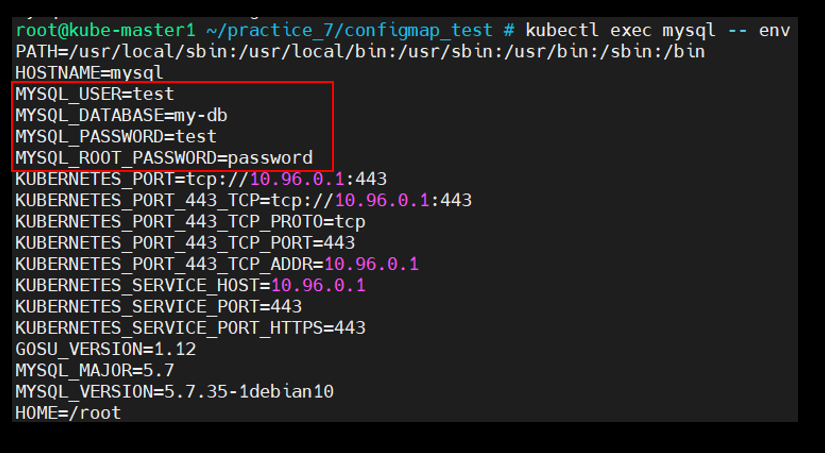
root@kube-master1 ~/practice_7/configmap_test # kubectl exec mysql -- env
PATH=/usr/local/sbin:/usr/local/bin:/usr/sbin:/usr/bin:/sbin:/bin
HOSTNAME=mysql
MYSQL_USER=test
MYSQL_DATABASE=my-db
MYSQL_PASSWORD=test
MYSQL_ROOT_PASSWORD=password
KUBERNETES_PORT=tcp://10.96.0.1:443
KUBERNETES_PORT_443_TCP=tcp://10.96.0.1:443
KUBERNETES_PORT_443_TCP_PROTO=tcp
KUBERNETES_PORT_443_TCP_PORT=443
KUBERNETES_PORT_443_TCP_ADDR=10.96.0.1
KUBERNETES_SERVICE_HOST=10.96.0.1
KUBERNETES_SERVICE_PORT=443
KUBERNETES_SERVICE_PORT_HTTPS=443
GOSU_VERSION=1.12
MYSQL_MAJOR=5.7
MYSQL_VERSION=5.7.35-1debian10
HOME=/root
이제 mysql configmap 파일을 만들어준다. (매우 간단하다. 명령어로 하는 방법도 존재)
# vi mysql-configmap

MYSQL_ROOT_PASSWORD=password
MYSQL_DATABASE=my-db
MYSQL_USER=test
MYSQL_PASSWORD=test

############################ 명령어로 하는 방법 ############################
kubectl create configmap mysql-envfile --from-literal MYSQL_ROOT_PASSWORD=password --from-literal MYSQL_DATABASE=my-db --from-literal MYSQL_USER=test --from-literal MYSQL_PASSWORD=test
해당 파일을 configmap으로 만들 수 있는 명령은 다음과 같다.
환경설정 파일이므로 '--from-env-file'이 꼭 들어가야 key:value 쌍으로 잘 인식한다.
kubectl create configmap mysql-env --from-env-file mysql-configmap

kubectl get configmap mysql-envfile -o yaml  # yaml파일로 구조를 확인, json 명령도 존재
이제 mysql을 실행시켜준다. 여기서부터는 chapter 6와 똑같다.(서비스도 동일하게 실행 건들 x)
# vi mysql-pod.yaml

apiVersion: v1
kind: Pod
metadata:
  name: mysql
  labels:
    app: mysql
spec:
  containers:
  - name: my-mysql-container
    image: mysql:5.7
    envFrom:
    - configMapRef:
        name: mysql-envfile
    ports:
    - containerPort: 3306
      protocol: TCP
kubectl apply -f mysql-pod.yaml

kubectl apply -f mysql-pod-service.yaml
이제 wordpress 환경변수를 configmap으로 만들어야 한다.
wordpress도 동일하게 모르겠으면 yaml 파일 env구조를 configmap으로 만들어보면 된다.(이 부분은 pass)
# vi wordpress-configmap

WORDPRESS_DB_HOST=mysql-pod-service
WORDPRESS_DB_USER=test
WORDPRESS_DB_PASSWORD=test
WORDPRESS_DB_NAME=my-db
# vi wordpress-replicaset.yaml
apiVersion: apps/v1
kind: ReplicaSet
metadata:
name: wordpress-replicas
labels:
app: wordpress-replicas
spec:
replicas: 1
selector:
matchLabels:
app: wordpress-replicas
template:
metadata:
name: wordpress-replicas
labels:
app: wordpress-replicas
spec:
containers:
- name: wordpress
image: wordpress:latest
envFrom: # envFrom 하위에 configMap을 정의한다.
- configMapRef:
name: wordpress-envfile # 위에서 생성한 configMap
ports:
- containerPort: 80kubectl create configmap wordpress-envfile --from-env-file wordpress-configmap
kubectl get configmap wordpress-envfile -o yaml
kubectl apply -f wordpress-replicaset.yaml

kubectl apply -f wordpress-replicaset-nodePort.yaml
2. nginx:latest 이미지에서 nignx 설정 파일인 default.conf를 configmap으로 생성
3. default.conf 설정에서 404 error page 활성화
nginx에서 default.conf 구조를 모르기 때문에 docker로 pull 해온다.
docker run -d nginx:latest

docker exec -it [CONTAINER ID] bash
접속하면 default.conf 파일을 찾아야 한다 → find / -name default.conf

vi 명령이 존재하지 않기 때문에, cat으로 열고에 메모장으로 긁어 옮긴 다음 내 k8s node에 default.conf 파일을 생성한다.

이제 default.conf 설정에서 404 error page만 활성화해주고 configmap으로 생성한다.
server {
    listen       80;
    listen  [::]:80;
    server_name  localhost;

    #access_log  /var/log/nginx/host.access.log  main;

    location / {
        root   /usr/share/nginx/html;
        index  index.html index.htm;
    }

    error_page  404              /404.html;  # 이 부분에 주석해제한다.

    # redirect server error pages to the static page /50x.html
    #
    error_page   500 502 503 504  /50x.html;
    location = /50x.html {
        root   /usr/share/nginx/html;
    }
    ...
kubectl create configmap nginx-default-conf --from-file default.conf  # 생성

kubectl get configmap nginx-default-conf -o yaml  # 확인
4. docs 디렉터리 생성 후 index.html, hello.html, 404.html 파일 생성
mkdir docs && cd docs# vi 404.html
<!DOCTYPE html>
<html>
<head>
<link rel="stylesheet" type="text/css" href="/_errors/main.css"/>
<title>Error 404 - %{HOSTNAME}</title>
<style>
html{
background-color: #e74c3c;
}
body{
color: #fefefe;
}
</style>
</head>
<body>
<div class="error-middle">
<h1>Error 404 - Not Found</h1>
<p>The 404 (Not Found) status code indicates that the origin server did not find a current representation for the target resource or is not willing to disclose that one exists. A 404 status code does not indicate whether this lack of representation is temporary or permanent; the 410 (Gone) status code is preferred over 404 if the origin server knows, presumably through some configurable means, that the condition is likely to be permanent.</p>
</div>
</body>
</html># vi hello.html
<!DOCTYPE html>
<html>
<head>
<title>Welcome to nginx!</title>
<style>
body {
width: 35em;
margin: 0 auto;
font-family: Tahoma, Verdana, Arial, sans-serif;
}
</style>
</head>
<body>
<h1>Welcome to nginx!</h1>
<p>If you see this page, the nginx web server is successfully installed and
working. Further configuration is required.</p>
<p>For online documentation and support please refer to
<a href="http://nginx.org/">nginx.org</a>.<br/>
Commercial support is available at
<a href="http://nginx.com/">nginx.com</a>.</p>
<p><em>This is hello.html</em></p>
</body>
</html># vi index.hmtl
<!DOCTYPE html>
<html>
<head>
<title>Welcome to nginx!</title>
<style>
body {
width: 35em;
margin: 0 auto;
font-family: Tahoma, Verdana, Arial, sans-serif;
}
</style>
</head>
<body>
<h1>Welcome to nginx!</h1>
<p>If you see this page, the nginx web server is successfully installed and
working. Further configuration is required.</p>
<p>For online documentation and support please refer to
<a href="http://nginx.org/">nginx.org</a>.<br/>
Commercial support is available at
<a href="http://nginx.com/">nginx.com</a>.</p>
<p><em>Thank you for using nginx.</em></p>
</body>
</html>5. docs 디렉토리 전체를 대상으로 ( --from-file=./docs) configmap 생성
kubectl create configmap nginx-page-docs --from-file=./docs  # 생성

kubectl get configmap nginx-page-docs -o yaml  # 확인
6. nginx를 올려서 확인해보기
# vi nginx-test.yaml

apiVersion: v1
kind: Pod
metadata:
  name: nginx-volume-pod
  labels:
    app: nginx-test
spec:
  containers:
    - name: my-nginx-container
      image: nginx:latest
      volumeMounts:  # 우리가 작성한 envfile을 적용하기 위함
      - name: nginx-volume
        mountPath: /usr/share/nginx/html  # docs안에 파일들이 mount되는 위치
      - name: nginx-default-conf
        mountPath: /etc/nginx/conf.d  # default.conf가 mount되는 위치
      ports:
      - containerPort: 80

  volumes:
  - name: nginx-volume
    configMap:
      name: nginx-page-docs


  - name: nginx-default-conf
    configMap:
      name: nginx-default-conf
# vi nginx-test-service.yaml
apiVersion: v1
kind: Service
metadata:
name: nginx-test-nodeport
spec:
ports:
- name: nginx-test-port
port: 8080
targetPort: 80
selector:
app: nginx-test
type: NodePortkubectl apply -f nginx-test.yaml # pod 실행
kubectl apply -f nginx-test-service.yaml # service 실행
hello.html / 404.html / index.html 모두 잘 호출되었다 성공!

7. 소감
어려웠던 점: 밥 먹고 오후 수업이라 상태가 메롱인 상태에서 들어서 configMap이 무엇인지 왜 쓰는지 이해가 되지 않았다. 물론 응용하는 방법도 어려웠다.
해결방안: ppt를 다시 읽어보고 모르는 부분은 질문을 통하여 해결하였다. 그리고 보는 것보다 직접 실습해서 타이핑 치니까 이해가 빠르게 되었다.
느낀 점: 급하게 구글링 하지 말고 천천히 ppt와 책을 참조하면서 하나씩 읽어보면 일단 지금 하는 거는 문제가 없을 것이다.
'Cloud > k8s' 카테고리의 다른 글
| Secert과 tls 타입의 시크릿 생성 후 mysql, wordpress, nginx 적용 (0) | 2021.08.11 |
|---|---|
| k8s 4일차 (0) | 2021.08.11 |
| mysql, wordpress, tomcat, python/flask를 pod, replicaset, deployment로 올리고 서비스 생성하기 (0) | 2021.08.10 |
| k8s 3일차 (0) | 2021.08.10 |
| k8s 2일차 (0) | 2021.08.06 |


